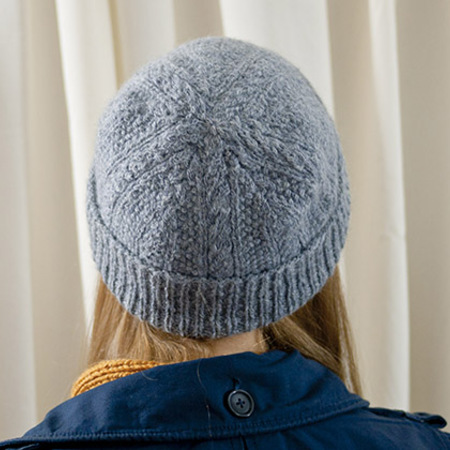


The Cabled Dad Hat was inspired by my own father's desire for a basic, but classy winter hat. Admittedly, after making the hat for him, I loved it so much that I wore it for a week before handing it over. The hat looks great with the brim folded up for a classic look, or unfolded so the back of the hat slouches down.
The hat is worked circularly from the bottom up. The patterning on the hat consists of a combination of seed stitch, ribbing, and easy twisted-stitch cables. The pattern is worked from a chart.
This hat coordinates perfectly with my Cabled Dad Mittens design.
Suggested: worsted weight 10ply
Pictured: Rowan Lima 84% baby alpaca, 8% merino wool, 8% Nylon, Color #880, 50g: 120 yds; 2 balls (180 yds used)
Ribbing: US size 6 (4 mm): 16” circular needles or set of double pointed needles (dpns)
Hat: US size 7 (4.5 mm): set of double pointed needles (dpns)
Adjust needle size to obtain stitch gauge.
24 sts and 34 rows = 4” in chart A pattern on larger needles
20" circumference
9.5” total length
The hat is modeled here on a 22" head, but fits heads from 21" - 24.5".
No errors have been reported.
Report an error.
Q: Is there a way to knit this hat with all the same needles?
A: Yes, you can use the larger needles for the whole hat if you just cast-on about 10% fewer stitches than what is called for in the pattern. You should be warned though, that If you knit the ribbing with a larger needle, it won’t look quite the same as what you see in the picture.
Q: Looking at the gauge and the number of stitches, it seems like the fabric would be very dense for a worsted weight yarn. Is the yarn actually a DK weight yarn?
A: No, the pattern is correct. The Rowan Lima is a worsted weight yarn. The yarn is definitely on the fluffy side though, so the resulting fabric with the 5mm needles came out very light with a nice drape. You could certainly substitute a dense DK yarn and get a similar result. Just make sure you get the correct gauge.
Q: I'm having trouble blocking this hat so it slouches nicely like yours does in your picture. Any advice?
A: The slouchiness of the hat is mostly due to the hand of the yarn, and less to do with how you block it. In other words the combination of yarn type and stitch gauge can greatly affect the drape of the fabric that you produce. If you're using a different yarn than suggested in the pattern, you will most certainly get a different result. If your hat is too stiff, wet-blocking with a rinse-less wool soap can help soften it a bit.
Q: I noticed on Ravelry that some people reduced the number of cast-on stitches to 96 for the ribbing section. Why did they do this?
A: The tightness of the ribbing section is a personal preference. I made one of these hats for myself, and love everything about the fit. I suspect that some people who substituted yarn may have noticed a difference in elasticity in the ribbing, and then decided that an adjustment was necessary. Obviously, if you have a smaller head, you may prefer to adjust the ribbing section for a better fit as well. If you're concerned about this, make two gauge swatches; one in 1x1 rib, and another for the cable pattern. You can judge if you like the fabric that your needles/yarn/hands produce, and if you need to make adjustments. Once you have a gauge measurement for the ribbing, it's easy to do the math to see if your ribbing will be tighter or looser than the pattern (6sts/inch)
Q: I'm at the section that begins the decreasing. I've knit 4 rows and it is clear it is not matching the established seed stitch and cable columns. I moved the start of the round...just seems I could move it over another 3 stitches? Many thanks for any advice
A: I have helped several people in the past who were confused at this point, and every one of them had either overlooked the K2tog symbol at the beginning of Row 1, which shifts the pattern 1 additional stitch, or they didn't understand that the decreases in the crown shaping gobble up every other column of cables.. If you move the beginning of rounds over 3 stitches as instructed, then proceed with Row 1 of Chart 2 as written, everything should work perfectly.
Q: How do you do the "Right Twist" stitch?
A: The "Right Twist" technique is described in the pattern under the Abbreviations section. Here is a link to very good video that explains how to do the Right Twist within the first minute:
https://youtu.be/Hzr-0EXyPlg